Red, White, and Blue Poke Cake: The Ultimate Patriotic Dessert Guide
When major holidays like the Fourth of July, Memorial Day, or Labor Day arrive, finding a dessert that looks spectacular, feeds a large crowd, and perfectly matches the celebratory theme is a high priority for home bakers. While multi-tiered cakes or complex pastry flags look beautiful in a bakery case, they require advanced kitchen skills, steady hands, and hours of precise decorating.
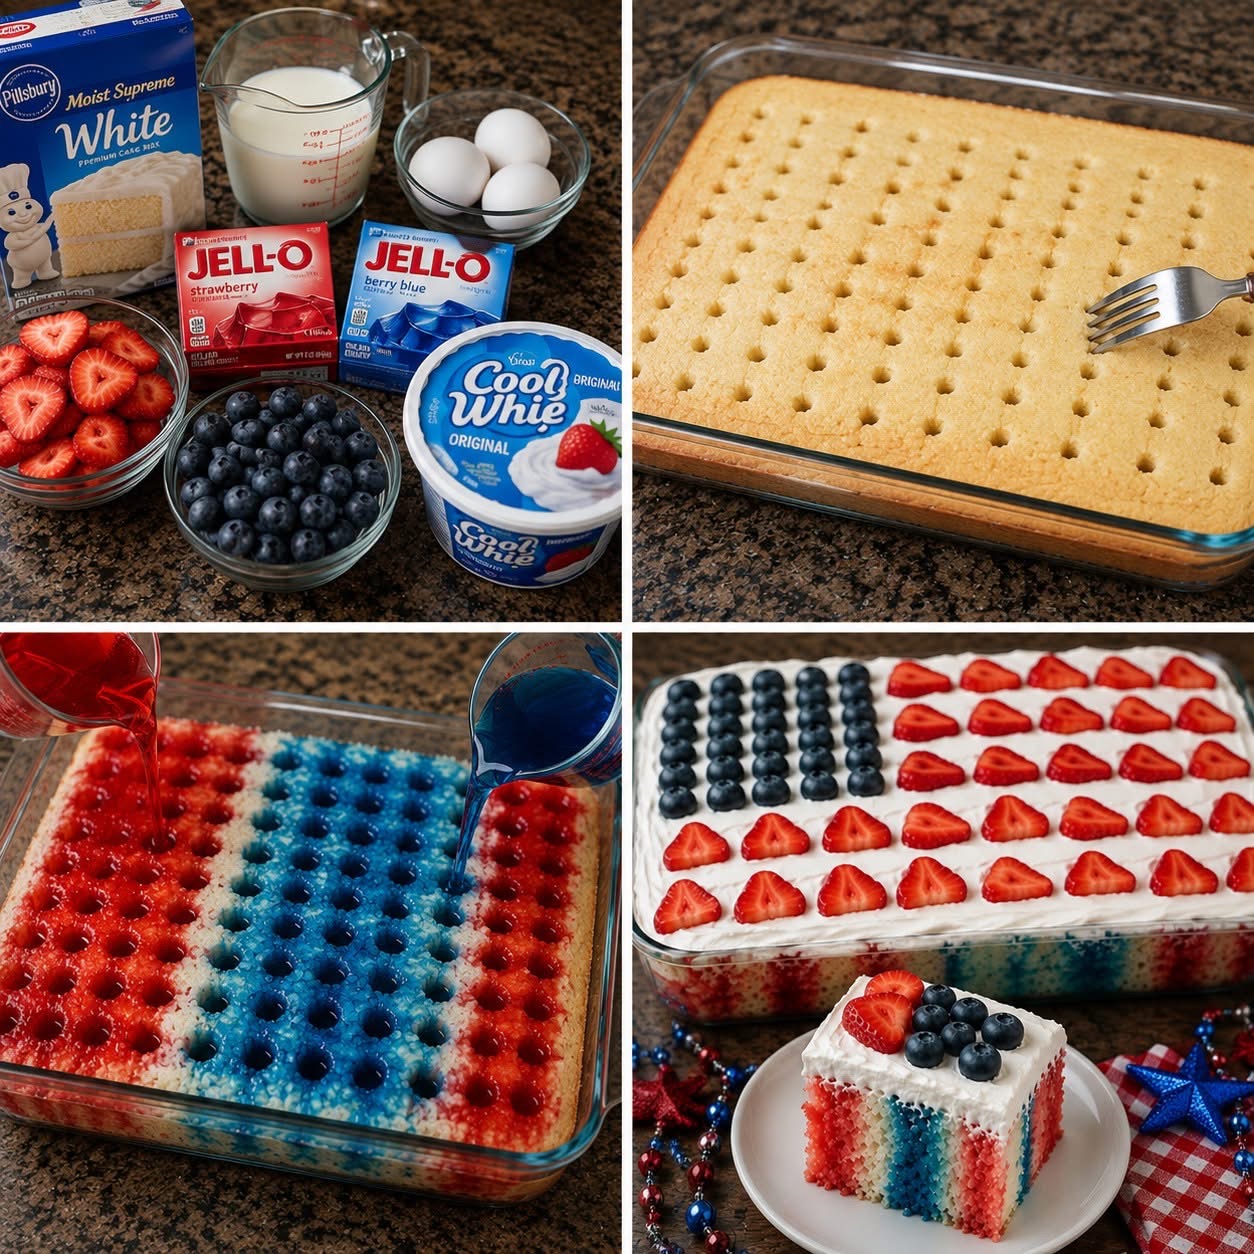
Fortunately, you can achieve a striking, festive presentation with an classic baking hack. The retro Red, White, and Blue Poke Cake turns a simple boxed mix into a colorful, moist masterpiece. As showcased in the detailed four-panel guide in image.png, this technique injects bold red and blue stripes directly into a tender sponge, resulting in a stunning tie-dye effect inside every single slice.
The Food Science Behind a Perfect Poke Cake
The concept of a “poke cake” dates back decades, designed as a clever way to keep sheet cakes incredibly moist while adding bursts of complementary flavor. The physical process relies on simple absorption mechanics.
When a standard sponge cake bakes, a matrix of tiny air pockets forms within the flour structure. If you pour a warm liquid over a completely flat cake, the liquid will merely pool on top or run off the edges. By systematically punching deep vertical channels into the sponge, you expose the interior crumb.
When warm, liquid gelatin is poured over these channels, it travels downward, soaking into the adjacent walls of the sponge. As the cake cools in the refrigerator, the gelatin solidifies slightly. This sets the vibrant colors into clean vertical columns and locks moisture directly into the crumb, preventing the cake from drying out even if it is prepared days in advance.
Component Breakdown: Gathering Your Supplies
As displayed in the ingredient preparation layout (top-left panel of image.png), this recipe relies on a few easily accessible, budget-friendly staples:
1. The Sponge Base
A box of standard white cake mix (such as Pillsbury Moist Supreme) serves as the perfect neutral canvas. Using a white cake mix rather than a yellow cake mix is crucial; the bright white background ensures that the red and blue gelatin colors pop vividly without any yellow undertones muddying the final design.
2. The Liquid Color Matrix
To create the iconic patriotic design, you will need one box of strawberry or raspberry flavored gelatin (red) and one box of berry blue flavored gelatin (blue). The fruity flavors add a refreshing, nostalgic brightness to the sweet cake.
3. The Creamy “White” Layer
A tub of whipped topping (like Cool Whip) provides the light, airy, snow-white blanket that covers the top of the cake. It acts as the anchor for your fresh fruit toppings and mimics the white stripes of a traditional flag.
4. Fresh Berry Garnishes
A pint of fresh strawberries (stemmed and sliced vertically) and a pint of plump, fresh blueberries provide a natural, elegant garnish. They add a crisp, juicy texture that balances the soft cream and sweet cake underneath.
Step-by-Step Assembly and Layering Guide
The visual progression in image.png outlines a foolproof roadmap for executing this recipe cleanly. Follow these instructions to assemble your dessert:
[Bake & Cool White Cake] ──> [Poke Uniform Channels] ──> [Pour Alternating Gelatin] ──> [Frost & Decorate with Berries]Step 1: Bake and Prep the Base
Bake your white cake mix in a standard 13\times9\text{-inch} glass or ceramic baking dish according to the package instructions (usually requiring water, vegetable oil, and egg whites). Once baked, remove the pan from the oven and let it cool completely to room temperature. Trying to add liquid to a hot cake will cause the sponge to dissolve into mush.
Step 2: Creating the Channels
Once the cake is cool, take a large fork or the round handle of a wooden spoon. Moving in a straight, grid-like pattern across the entire surface of the cake, poke deep vertical holes into the sponge, stopping just before you hit the bottom of the pan (top-right panel of image.png). Space the holes roughly \frac{1}{2}\text{-inch} apart to ensure even distribution of the colors.
Step 3: The Precision Pour
In two separate bowls, dissolve each box of gelatin in 1\text{ cup} of boiling water. Do not add the cold water typically required on the box directions; you want the gelatin concentrated so it sets firmly inside the cake channels.
Using a steady hand, a small measuring cup, or a squeeze bottle, carefully pour the liquid red gelatin into three distinct columns down the length of the cake. Next, fill the remaining empty center rows with the liquid blue gelatin, as captured in the bottom-left panel of image.png.
Step 4: The Chill and Garnish
Cover the pan with plastic wrap and slide it into the refrigerator for at least 4 hours to allow the gelatin columns to firm up. Once chilled, spread an even, smooth layer of whipped topping across the entire surface.
To recreate the beautiful patriotic flag pattern shown in the bottom-right panel of the image, arrange a neat square of fresh blueberries in the top-left corner. Then, lay your sliced strawberries in horizontal rows across the remaining white cream to create beautiful flag stripes.
Pro-Tips for Clean Slices and Storage
To ensure your cake turns out as beautifully geometric as the individual slice shown on the presentation plate, keep these expert tips in mind:
The Clean Cutting Secret: Cutting through layers of whipped topping, gelatin-soaked cake, and fresh fruit can easily turn messy. To get a perfect, distinct block slice showing off the clear interior red and blue lines, use a long, sharp knife. Dip the blade in hot water, wipe it dry with a paper towel, and make a single, decisive slice down through the cake. Wipe the blade clean between every single cut.
- Prep Ahead Advantage: This cake actually tastes significantly better when made 24 hours in advance. The extra time allows the gelatin to fully hydrate the sponge cake, resulting in an incredibly moist texture. Keep the cake stored in the refrigerator until the exact moment you are ready to slice and serve it.
- Preventing Berry Bleed: If you are traveling with the cake or making it a day ahead, add the fresh strawberries and blueberries right before you plan to serve it. This prevents the moisture from the cut strawberries from bleeding pink juice into your pristine white whipped frosting.