10-Minute Spiced Apricot Danish: The Ultimate Refrigerated Biscuit Hack
When you want a warm, flaky pastry on a weekend morning, the traditional process of laminating dough with layers of cold butter can take hours of meticulous rolling, chilling, and waiting. For busy home cooks or anyone hosting a last-minute brunch, that timeline simply isn’t practical.
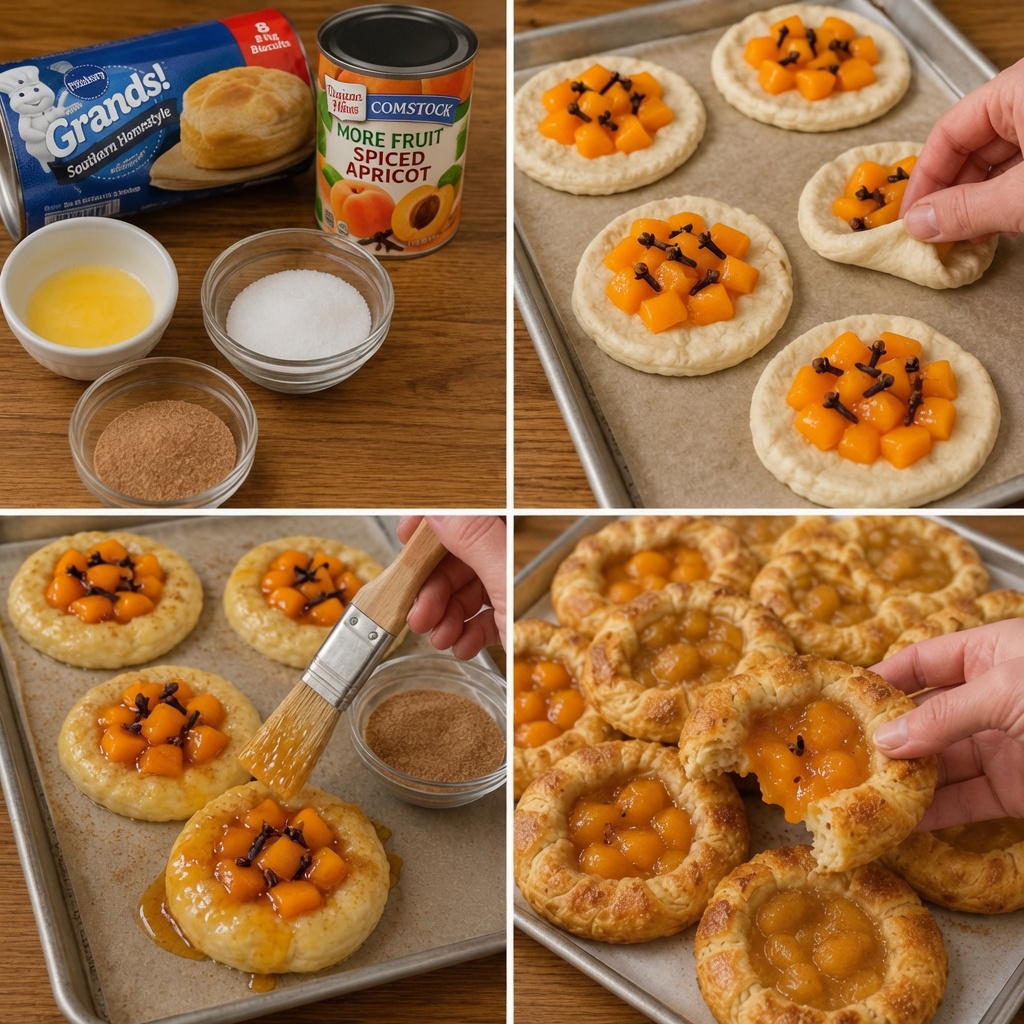
Fortunately, you can achieve a golden, bakery-quality treat in a fraction of the time using a clever baking hack. By combining pre-made refrigerated flaky biscuits with premium canned fruit filling, you can create elegant, individualized fruit danishes. As shown in the detailed step-by-step photography in image_3.png, this method bypasses the stressful prep work while delivering a stunning, professional-looking dessert.
Why This Baking Shortcut Works
The secret to this recipe’s success lies in the science of industrial dough production. Brands like Pillsbury Grands! use a specialized manufacturing technique that sheets the dough multiple times, creating distinct, micro-thin layers of fat and flour.
When placed in a hot oven, the moisture in those layers turns to steam, forcing the dough to rise into dozens of flaky, tender layers. By repurposing this dough as a pastry base rather than baking it as a standard biscuit, you gain an immediate foundation that mimics a classic Danish pastry crust.
Gathering Your Ingredients
As displayed in the top-left quadrant of image_3.png, you only need five basic pantry ingredients to execute this recipe flawlessly:
- Refrigerated Flaky Biscuits: Choose a “Southern Homestyle” or “Flaky Layers” variety. Avoid the smooth, dense varieties, as they will bake into a heavy, bread-like texture rather than a light pastry.
- Canned Spiced Apricot Filling: Utilizing a high-quality fruit filling (like Comstock More Fruit Spiced Apricot, seen in the image) gives you an instant, glossy center. The apricots bring a beautiful balance of bright tartness and deep autumnal sweetness.
- Whole Cloves: A few whole cloves placed carefully into the fruit add an unmistakable aromatically warm, woodsy punch that cuts through the sugar.
- Melted Butter: Used to brush the exterior dough. This gives the pastry its characteristic glossy finish and helps the sugar coating stick securely.
- Cinnamon Sugar: A simple blend of granulated white sugar and ground cinnamon adds a delightful crystalline crunch to the outer rim of the Danish.
Step-by-Step Assembly Guide
The visual timeline in image_3.png provides a clear roadmap for putting these pastries together. Follow these directions for a perfect bake:
[Flatten Biscuit Rounds] ──> [Top with Fruit & Cloves] ──> [Brush with Melted Butter] ──> [Bake Until Golden]Step 1: Shape the Bases
Preheat your oven to 190^\circ\text{C} (375^\circ\text{F}) and line a large baking sheet with parchment paper. Separate your refrigerated biscuits. Place each round onto the parchment paper and use your fingers or the bottom of a smooth glass to flatten them slightly, pressing a shallow, wide well into the center of each disc while leaving a raised border around the edge.
Step 2: Fill and Spice
Spoon a generous tablespoon of the canned spiced apricot filling directly into the center well of each dough round. To elevate the flavor profile and visual style, carefully press 4 to 5 whole cloves into the fruit pieces on each pastry, as shown in the top-right panel of the image.
Step 3: The Butter and Sugar Finish
Using a pastry brush, generously coat the exposed outer edges of the biscuit dough with your melted butter (bottom-left panel). Immediately following the butter wash, sprinkle a heavy layer of your cinnamon sugar mixture over the wet dough borders. This step is crucial for achieving that signature deep-brown, caramelized crunch.
Step 4: Bake to Perfection
Slide the baking sheet into the center rack of your oven and bake for 12 to 15 minutes. Keep a close eye on them; you want the edges to puff up dramatically and turn a deep, golden mahogany brown, while the fruit filling bubbles in the center. Let them cool on the pan for 5 minutes before serving warm (bottom-right panel).
Customizing and Storing Your Pastries
One of the best aspects of this recipe is its versatility. Once you master the basic biscuit technique shown in image_3.png, you can adapt the concept to fit whatever ingredients you happen to have in your kitchen.
Flavors to Try: Swap the spiced apricot for canned cherry filling, apple pie filling, or wild blueberry preserves. For an extra decadent layer, place a teaspoon of sweetened cream cheese at the bottom of the well before spooning the fruit on top.
Storage and Reheating
If you have leftover danishes, allow them to cool completely to room temperature. Store them in a single layer inside an airtight container lined with a paper towel to absorb excess moisture. They will keep well at room temperature for up to 48 hours. When you are ready to enjoy one, skip the microwave—which will make the biscuit base chewy—and pop the Danish into a toaster oven at 175^\circ\text{C} (350^\circ\text{F}) for 3 to 4 minutes to restore its flaky crunch.