The Nostalgic Classic: How to Make a Perfect Frozen Fruit Salad Squares Dessert
When it comes to vintage American desserts, few categories evoke as much sweet nostalgia as mid-century “fluff” salads and molded frozen treats. Often a staple at Thanksgiving dinners, summer block parties, and church potlucks, these dishes beautifully blur the line between a side salad and a decadent dessert.
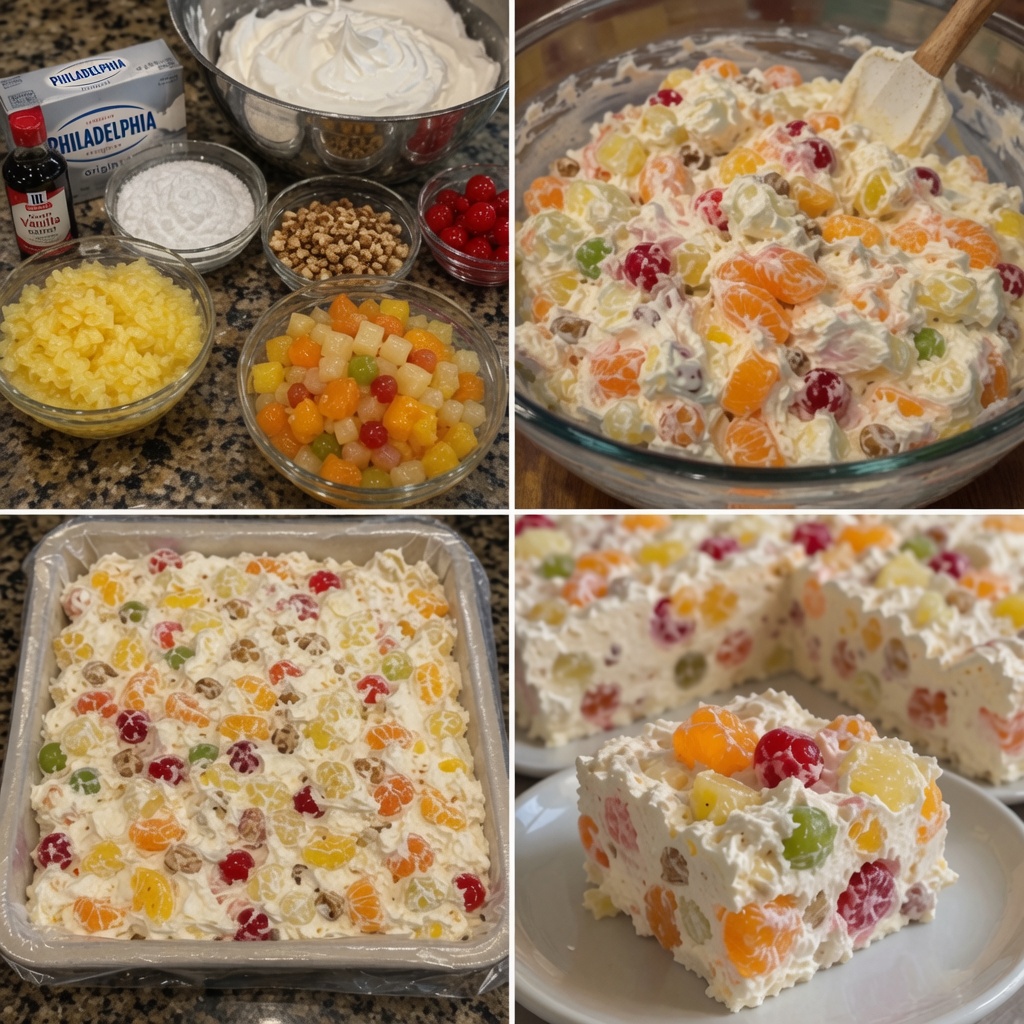
While many traditional recipes call for serving these mixtures loose in a large mixing bowl, a few simple adjustments allow you to transform it into an elegant, sliceable frozen dessert square. As displayed in the step-by-step photography within image_4.png, this dish brings together a vibrant variety of colorful fruits folded into a rich, structured cream base that slices beautifully once chilled.
The Science of the Perfect Sliceable Cream Base
The biggest challenge when making a frozen fruit dessert is texture. If you simply freeze fruit mixed with whipped cream, it will turn into an icy, solid block that is incredibly difficult to cut or chew. To get a texture that remains soft, velvety, and sliceable even straight out of the freezer, you need an emulsified foundation.
As shown in the ingredient preparation layout in image_4.png, this recipe relies on a specific combination of binders:
- Softened Cream Cheese: Using a block of standard cream cheese (such as Philadelphia brand) provides the structure and fat content necessary to prevent large ice crystals from forming. The mild tang also helps cut through the sweetness of the fruit.
- Powdered Sugar: Granulated sugar can leave a gritty texture in cold desserts. Powdered sugar dissolves instantly into the fat molecules of the cream cheese, providing smooth, stable sweetness.
- Whipped Topping or Whipped Cream: This introduces tiny air bubbles into the matrix. When frozen, these pockets of air keep the dessert light, airy, and soft enough to bite through effortlessly.
- Pure Vanilla Extract: A small splash enhances the dairy notes and ties the natural flavors of the fruit together.
Selecting and Preparing Your Fruit Mosaic
The visual appeal of this dessert relies entirely on creating a colorful mosaic pattern. In the bottom-right panel of image_4.png, you can see how the jewel-like pieces of fruit stand out beautifully against the bright white cream background.
To achieve this look and ensure the dessert sets properly, the choice and preparation of your fruit are paramount:
1. Crushed Pineapple and Mandarin Oranges
Canned fruits work exceptionally well in frozen desserts because they are consistently sweet and perfectly soft. Mandarin orange segments provide bright pops of orange, while crushed pineapple distributes fine pockets of tropical acidity throughout every bite.
2. Maraschino Cherries and Fruit Cocktail Gems
For brilliant red, green, and yellow highlights, a combination of drained fruit cocktail and chopped maraschino cherries is ideal. The cherries add a distinct, sweet almond-like fruit flavor that characterizes classic retro desserts.
3. Chopped Nuts for Texture
While the fruits provide a soft chew, adding a handful of chopped walnuts or pecans (visible in the ingredient station of image_4.png) introduces a much-needed earthy crunch that grounds the rich, sweet elements of the dessert.
The Golden Rule of Prep: Moisture is the enemy of a structured frozen salad. You must drain all your canned fruits and cherries in a fine-mesh strainer for at least 15 to 20 minutes before mixing. If excess juice or syrup leaks into the cream base, it will thin out the mixture and turn into solid, crunchy ice sheets in the freezer.
Step-by-Step Assembly Guide
The visual timeline in image_4.png provides a clear roadmap for creating this stunning dessert at home. Follow these steps for a flawless presentation:
[Mise en Place & Whip Base] ──> [Gently Fold Fruits] ──> [Press into Lined Pan] ──> [Freeze & Slice Clean]Step 1: Whip the Base Foundation
In a large mixing bowl, beat your softened cream cheese, powdered sugar, and vanilla extract together with a hand mixer until completely smooth and free of lumps. Once smooth, use a rubber spatula to gently fold in your whipped topping until the mixture is uniform, light, and fluffy.
Step 2: Fold in the Mix-Ins
Dump your thoroughly drained fruit cocktail, crushed pineapple, mandarin segments, chopped cherries, and nuts directly into the bowl (top-right panel of image_4.png). Using your spatula, gently fold the ingredients using a bottom-to-top motion. Be careful not to over-mix, or you risk breaking up the delicate mandarin segments and bleeding the red cherry juice into the white cream.
Step 3: Prep the Pan and Pack
Line an 8×8 or 9×9-inch baking square pan with plastic wrap, leaving a generous overhang on all sides (bottom-left panel of image_4.png). This overhang is crucial, as it allows you to easily lift the entire frozen block out of the pan later. Pour the mixture into the lined pan, smoothing down the top with your spatula to ensure there are no trapped pockets of air.
Step 4: Freeze and Serve
Fold the excess plastic wrap over the top to seal it tightly, then place the pan flat in your freezer for at least 4 to 6 hours (preferably overnight) until it is frozen solid.
When you are ready to serve, use the plastic wrap handles to lift the block onto a cutting board. Peel back the wrap, take a sharp chef’s knife, and run it under hot water for a few seconds. Wipe the blade dry and make clean, swift cuts to create perfect, geometric dessert squares (bottom-right panel of image_4.png). Garnish with an extra mandarin slice or cherry on top, and serve immediately!